Adaptive
Pen Plotter
Design for Social Good
An Ender 3 3D printer converted into a gesture-controlled pen plotter — enabling people with limited hand or arm mobility to draw and create using only their laptop and the pen plotter.
The Problem
Drawing is a physical act. Pencils, pens, and digital tablets all require you to grip, position, and move with precision. For people with limited hand or arm mobility — due to conditions like cerebral palsy or muscular dystrophy — that bar is simply too high.
The social and creative cost is real. Art is how people communicate, process emotion, and participate in school and collaborative work. When every tool requires motor control you don't have, the activity becomes off-limits entirely.
Who Experiences This Problem?
This project was built with people with cerebral palsy specifically in mind. CP is the most common childhood motor disability — affecting roughly 1 in 345 children in the United States and about 17 million people worldwide. Most have some degree of spasticity or limited voluntary control in their hands, making fine motor tasks like drawing and writing difficult or impossible without assistance.
The same barriers apply to people with muscular dystrophy, spinal cord injuries, ALS, and other conditions that reduce upper-limb function. What they share is that the desire to create doesn't go away with motor impairment — the tools just stop working for them.
A professional-grade pen plotter — systems like this typically run $3,000 or more, yet remain inaccessible to users who can't operate them by hand.
How It Helps.
The plotter removes fine motor control as a requirement. A webcam reads hand position in real time and the machine traces that motion directly onto paper. There's no grip, no stylus to hold, no precise positioning — just movement in space. For someone who can't reliably control their fingers, that difference is the difference between being able to draw and not.
For people with cerebral palsy, CP disrupts the signals between brain and muscle, making small controlled movements unreliable or impossible. Muscular dystrophy progressively erodes the muscle strength fine motor work depends on. ALS degrades motor function over time. In each case, the intent to create stays intact long after the physical ability to execute it is gone. The plotter handles the execution.
Demo — gesture-controlled drawing. Click to enlarge.
Hardware
Design & Build
Ender 3 converted to a gesture-controlled pen plotter — custom frame, pen lift mechanism, safety system, and control electronics.
Technical blueprint — full plotter build. Click to enlarge.
Electronics & Wiring
The system runs on a 24V, 15A DC power supply that feeds both the Ender 3 mainboard and the relay coil. The mainboard handles all XY motion — streaming step and direction signals to the X and Y stepper motors. A separate 5V supply powers the solenoid, switched on and off by a relay module triggered from the Arduino.
The Arduino Leonardo sits between the computer and the hardware: it receives pen lift commands over USB, drives the relay, and monitors the physical E-stop button on pin 2. The computer runs two USB connections simultaneously — one to the Ender 3 for G-code streaming, and one to the Arduino for solenoid control.
Full system wiring diagram. Click to enlarge.
24V power supply — mains IEC input with fused switch.
Ender 3 mainboard, Arduino Leonardo, and relay module.
Base
The base of the plotter is laser cut from 4 mm laser ply — chosen for its flatness and ease of cutting precise mounting holes. All the structural components bolt down to it.
To connect the aluminium extrusion frame to the base, custom feet were 3D printed. Each foot captures the end of an extrusion and bolts through the ply, keeping the frame rigid and square without needing any adhesive.
Laser cut base
4 mm laser ply cut to the full footprint of the plotter. Holes positioned to match the extrusion foot mounting pattern.
3D printed feet
Custom PLA feet slide over the aluminium extrusion ends and bolt through the base, transferring load cleanly into the ply without stressing the extrusion profile.
CAD model — 3D printed feet connecting extrusion frame to lasercut base. Click to enlarge.
Pen Lift
Getting the pen to lift cleanly was harder than expected. The plotter needs to move between strokes without dragging — so we needed something that could push the pen down reliably and pull it back up, every time, without slipping.
It took three tries. The first two used servos, which weren't strong enough to push through the springs consistently. The third swapped in a solenoid and that fixed it.
3D-printed mount
A custom PLA mount holds the solenoid vertically above the pen carrier, keeping the actuator shaft aligned with the pen axis so the force transfers straight down without binding.
Solenoid actuator
A 5V push solenoid with enough stroke and force to reliably compress the pen spring. When energised it drives the pen into the paper; when released the spring pulls it back up.
Pen carrier
The pen slots into a printed collar at the bottom of the assembly. The spring keeps the pen raised by default — the solenoid only needs to overcome the spring to draw, so the machine is safe to leave in any state.
The final solenoid assembly — 3D-printed mount, solenoid actuator on top, and pen carrier below. The solenoid pushes the pen down to draw and retracts to lift it between strokes. Click to enlarge.
Design iterations
Servo + sliding carrier
A pen carrier on two rods, pushed down by a rotating servo. Quick to build but the 3D-printed parts flexed and the servo couldn't hold a consistent position.
Rod-actuated servo
Added guides on the front and sides to cut down on lateral movement, and had the servo push a rod instead of the pen directly. Still not enough torque to compress the springs reliably.
Solenoid
Replaced the servo entirely. The solenoid has more than enough force and fires cleanly every time. No slipping, no inconsistency.
Movement
Converting a 3D printer into a plotter meant rethinking how the machine moves — and running into problems that only show up when the axes are driven outside their original design assumptions.
Running into the ends
Without hard endstop limits tuned for the plotter's geometry, the carriage would slam into the frame at full speed — stripping belts and cracking printed parts. Soft limits in Marlin and conservative travel bounds in the control software fixed this.
Custom servo motor mounts
The stock X-axis carriage had no mounting points for the servo. Custom 3D-printed mounts were designed to hold the servo rigidly in alignment with the pen carrier, keeping the lift motion vertical and repeatable.
Belt mounts
The belt tensioning system on the converted axes needed custom brackets to keep the belts properly aligned under load. Loose or misaligned belts caused positioning drift that showed up as crooked lines on paper.
Aluminium extrusion frame
X and Y axes are built on aluminium extrusion — chosen for rigidity and modularity. The CAD model defines the extrusion layout and carriage travel paths for both axes.
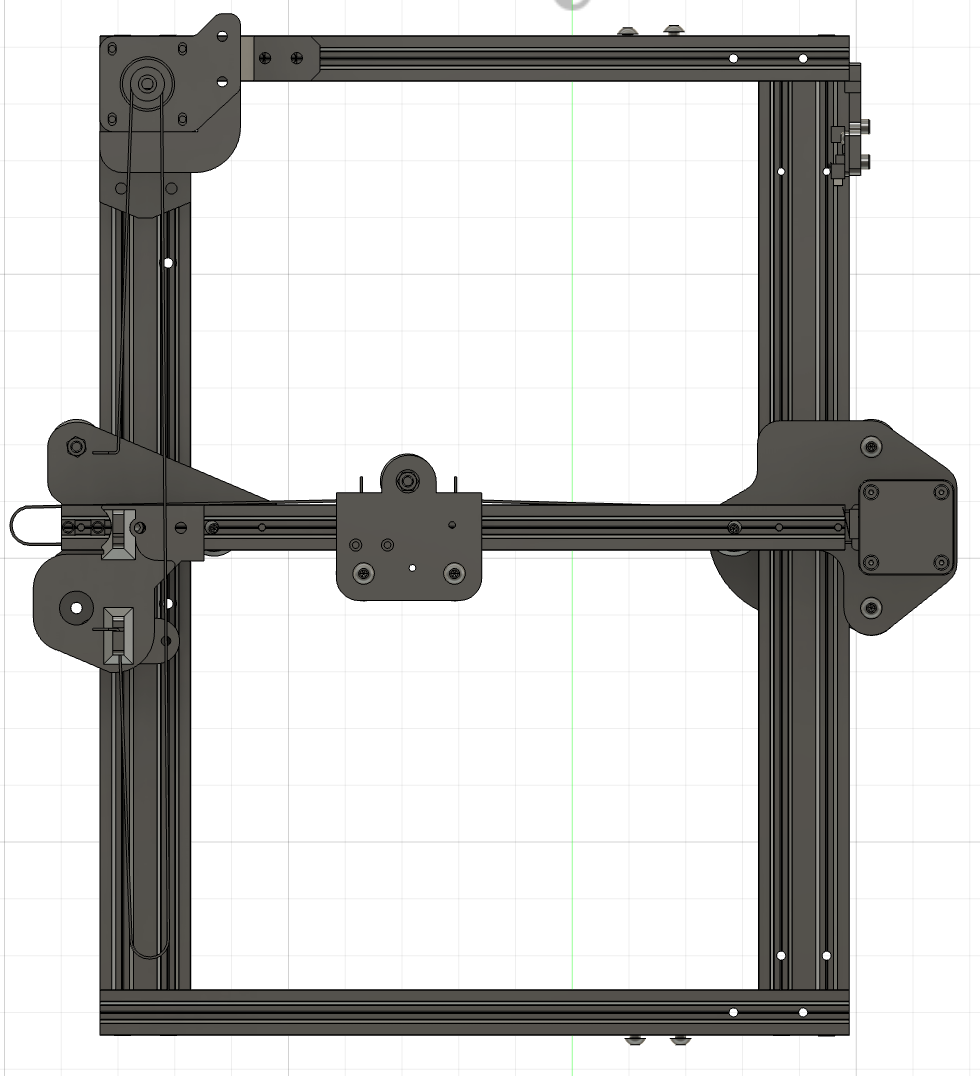
CAD model — aluminium extrusion layout for X and Y axes.
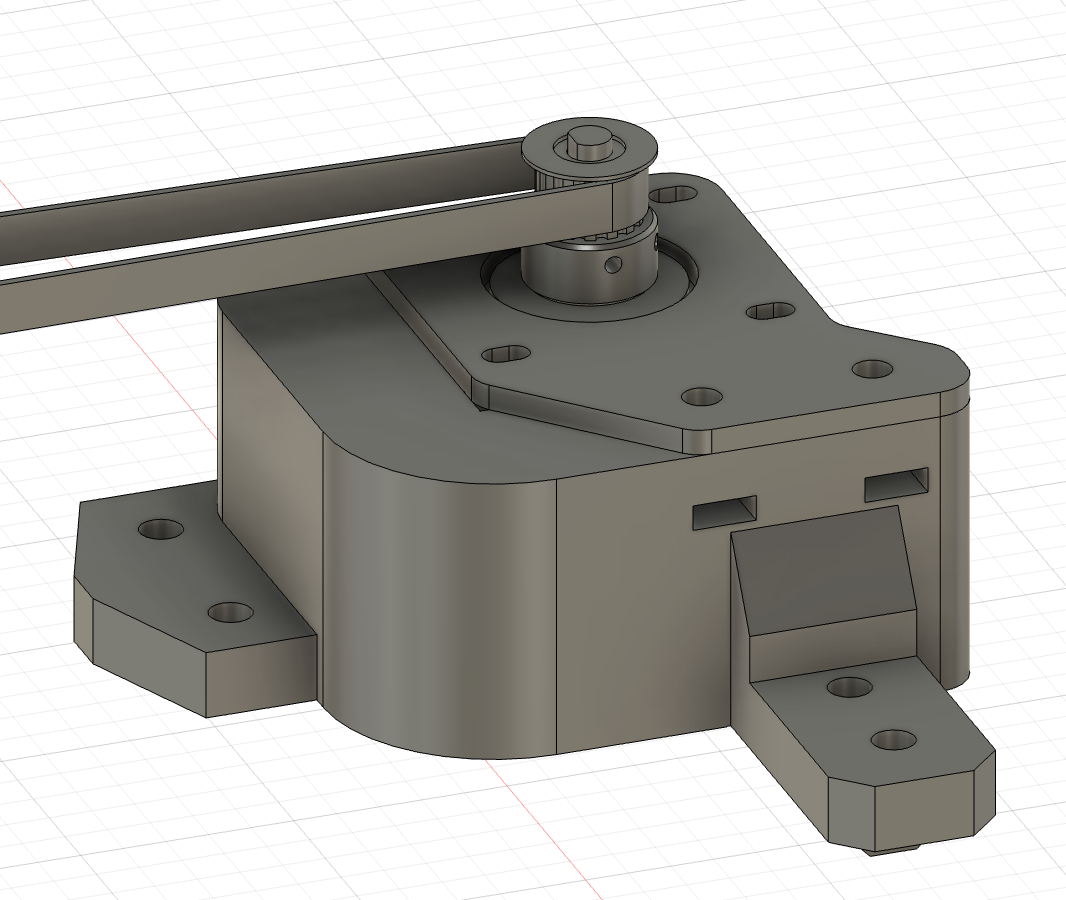
Servo mount for the Y axis.
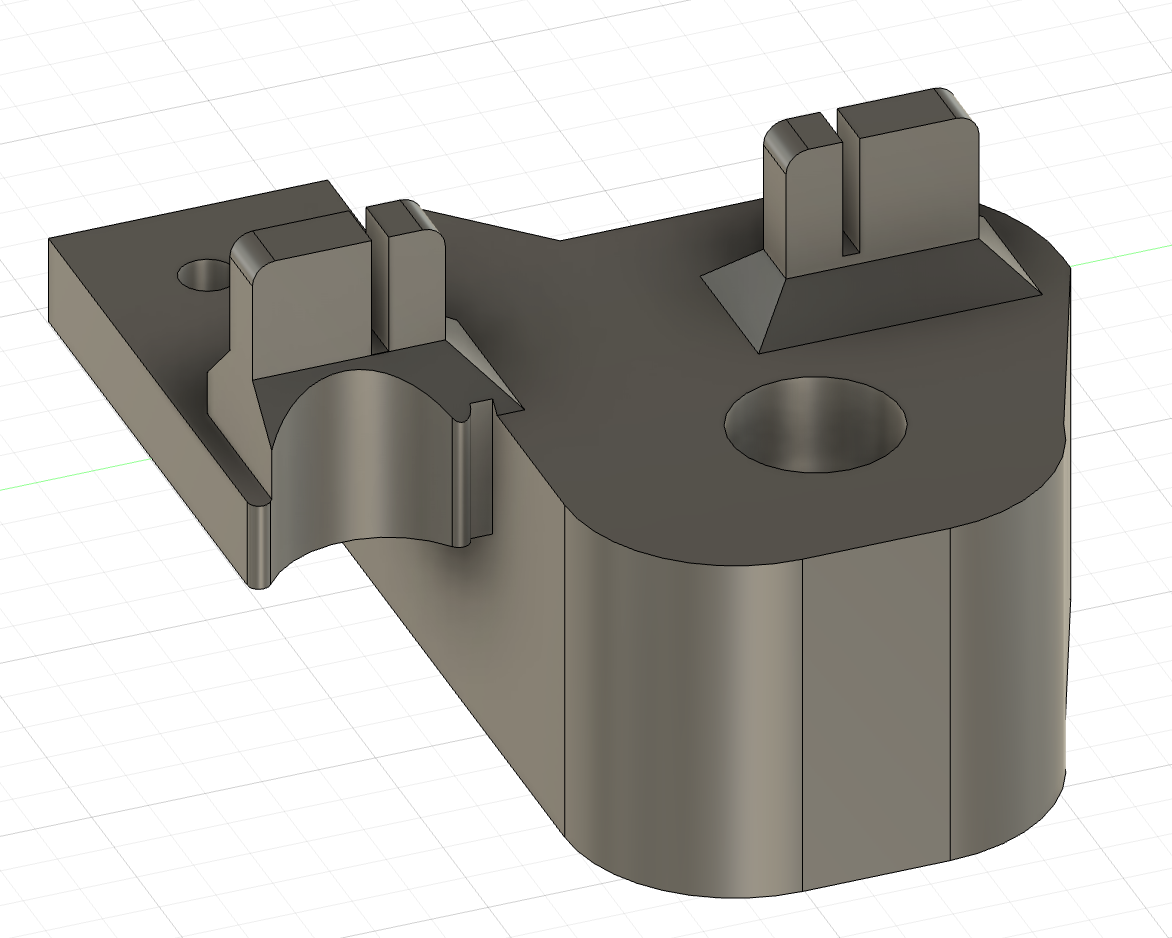
Y axis belt mount.
Safety System.
An Arduino Leonardo acts as a dedicated hardware safety controller. It enforces a 20-second solenoid cutoff in hardware regardless of software state — even if the app crashes or loses serial connection.
Safety limits that matter must live in hardware, not software.
InkPlotter
A custom Python desktop app built to control the plotter — handling everything from SVG import and hand-gesture drawing to G-code streaming and hardware safety. It runs two serial connections in parallel: one to Marlin for XY motion, and one to an Arduino that fires the solenoid relay to lift and lower the pen.
Input modes include SVG import, freehand canvas, hand gesture drawing via MediaPipe, handwriting generation, geometric patterns, and AI-assisted drawing. All serial I/O is non-blocking so the UI never freezes waiting for the machine.
InkPlotter — the custom desktop control app. Click to enlarge.
Face tracking panel. Click to enlarge.
Making It All Work Together.
Getting hardware, firmware, and software to behave as one system took longer than building any individual part. These are the problems that only appeared when everything was connected at once.
Dual Serial Timing
Running two USB connections simultaneously — one to Marlin for motion, one to the Arduino for solenoid control — meant commands could overlap. If a pen-lift signal arrived while a move was still executing, the solenoid would fire mid-stroke and drag the pen across the paper. Fixed by waiting for Marlin's ok acknowledgment before sending any solenoid command, so a move always completes before the pen lifts.
Coordinate Space Mapping
MediaPipe outputs hand position in webcam pixel coordinates. The plotter works in millimetre G-code space. The mapping between them isn't linear — hand depth from the camera shifts the apparent position, and the webcam's field of view doesn't match the plotter's draw area. Fixed by defining a calibration transform: we sampled four corner positions in both spaces and computed a scaling matrix to convert between them.
Marlin Soft Limits
The Ender 3 firmware shipped configured for a 3D printer bed — travel bounds that were completely wrong for the plotter's geometry. Without corrected limits, the carriage would slam into the frame at full speed. Required reflashing Marlin with updated soft limits and testing travel bounds incrementally before running any drawing jobs.
Solenoid Relay Bounce
The relay occasionally double-fired on the rising edge of the control signal, sending the solenoid down twice in rapid succession and leaving ink blobs at the start of strokes. Fixed with a 50ms debounce delay on the Arduino: after the relay fires, further trigger signals are ignored for long enough that the contact noise can't re-trigger it.
Ender 3 mainboard, Arduino, and relay — all connected and running.
Full plotter from above — XY gantry, lasercut base, and electronics.
Conclusion & Reflection.
The plotter works. Watching it draw from a hand gesture — no grip, no physical contact with the pen — is genuinely surprising even when you know exactly how it functions. Whether it fully solves the problem depends on where you set the bar. As a proof of concept for gesture-controlled accessibility hardware, it clears it easily. As something a person with CP could set up and use at home independently today, there's still work to do: calibration takes time, the setup isn't simple, and the draw area is small.
What surprised me most about accessibility design was how much it depends on specificity. “Limited motor control” covers an enormous range — someone with mild CP in one hand has completely different needs than someone with severe bilateral spasticity or progressive muscle weakness. Building one tool that works across that whole spectrum isn't realistic. The real challenge isn't engineering — it's knowing exactly who you're designing for and staying close to them throughout.
Authored by TroyThe hardest part was the pen lift. It sounds like a solved problem — lift a pen, lower a pen — but getting it to work reliably across hundreds of strokes took three full iterations and a complete change in approach. I went in expecting mechanics to be the challenge. It turned out to be force consistency.
If I were rebuilding it, I'd fix the cable management. Everything works, but the wiring on the moving carriage is messy — it constrains travel in ways we had to work around, and it's the part most likely to fail over time. A cable chain along the X axis would solve it. What I'm most proud of is the safety system. It would have been easy to handle the solenoid cutoff in software and call it done. Building the hardware cutoff into the Arduino — independent of the app, independent of the serial connection — meant the machine couldn't stay in an unsafe state even if everything else broke.
Overall, what I've learned about AI over the past few months is how much persistence it takes to get good results. Even with something as simple as building this website, I used AI, but I also spent hours feeding it quality information and refining what it produced. That was true for most of this project — we all used AI, but the most important part was starting with good information and knowing how to guide it.
I also realized that there are still plenty of things AI can't do for you. A lot of the hardest work came from integrating different systems, troubleshooting problems, and making sure everything worked together without breaking. AI was a useful tool, but it couldn't replace the problem-solving and persistence that the project required.